
Create an awesome infographic with these simple steps.

Step 1: Create the Background
Pick the Rectangle Tool (M). From the toolbar remove the color from the stroke and then select the fill and set its color to #d8d2d2. Move to your art-board and simply create an W: 297 mm H:210 mm rectangle.

Lock the Background.
Select the background and press cmd/ctrl+2 or Object->Lock-> Selection to lock the background layer.
Step 2: Create the Circle
Pick the Ellipse Tool (L). From the toolbar remove the color from the stroke and set fill color to #e5e5e5. Move to your artboard and simply create a 80 mm circle.

Step 3: Create Shades inside the circle
Select Object->Path->Offset Path
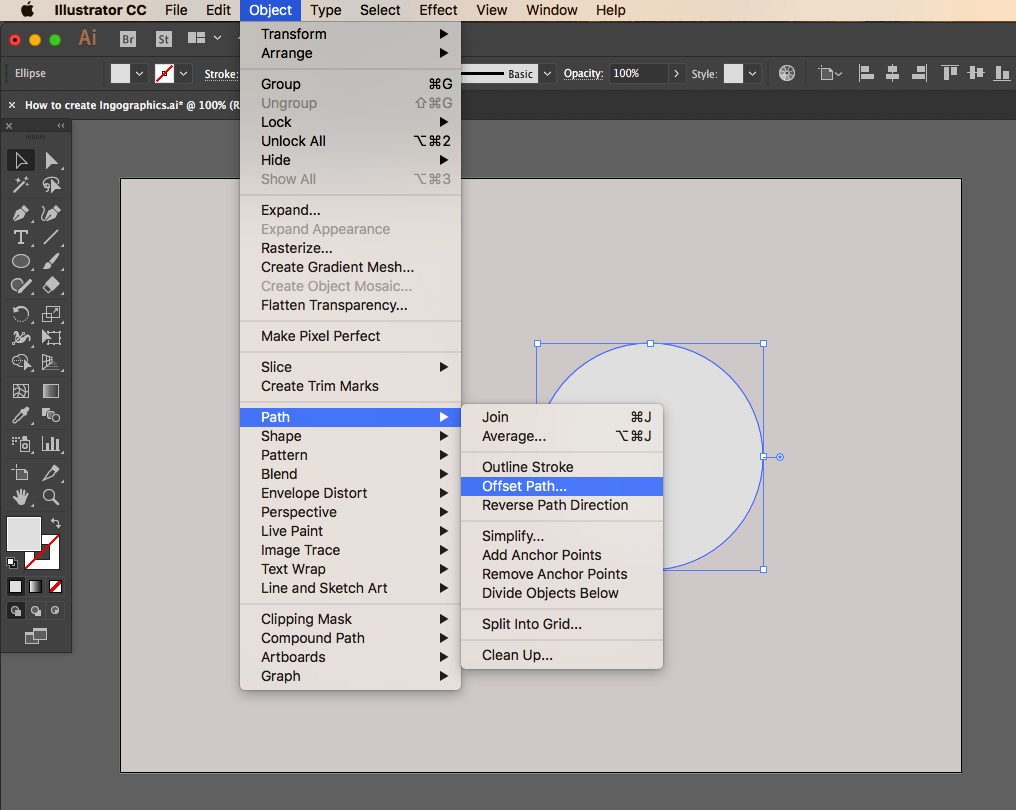
Give Offset as -1 mm.

Select Gradient and apply #a19e9e and #d8d2d2

Shift the gradient angle to create a shade effect from left to right

Select the out ellipse

Select Effect -> Stylize-> Drop Shadow
Change mode as Multiply and Opacity 50%

Step 4: Pie Chart Creation
Save the current layer as Circle and create a new layer as Pie Chart

Create the copy of the inner circle under Pie Chart Layer:

Copy (Cmd/Ctrl+C) and Paste(Cmd/Ctrl+V) the circle again and scale that circle to 180mm*180mm.
Before start to work on the pie chart Select Rulers from View
View->Rulers->Show Rulers

Drag and keep Guides in horizontal and perpendicular to the circle.


Bring the 80 mm circle to front. Select Line Segment Tool from Tools options.


Create a perpendicular line above the circle as shown below

Select Rotate Tool from Tools Option

Press Shift+Alt and click on the center of circle then rotate dialogue box will open as below.
Select angle as 36 degree and press Copy to create a new line.

Press Control/Cmd + D to create a multiple lines in a same angle difference.

Select Circle (Pink) and all the lines. Go to Pathfinder options and select Divide to split the circle.
Press Control+Shift+G/Cmd +Shift+G to ungroup the splits.


Delete the irrelevant right half of the circle


Recolor the pie’s as below color code


Rearrange the center circle (80*80 mm) and bring that to front
Shift+ Cmd/ctrl +]

Create the copy of the circle and scale that circle to 210mm*210mm; Fill as None and Stroke as black with 1 mm.

Create the copy of the circle and scale that circle to 170mm*170mm; Fill as none and Stroke as #d8d2d2 with 7 mm

Go to Object and Select Expand to expand the Image.


Create the Ellipse(L) and fill with the gradient(Black and White); Change the gradient options to Radial;
Hit the reverse option to reverse the color

Select the gradient tool from the Tools panel to fix the angle of gradient.
Create the rectangle with black fill; Cut (Cmd/Ctrl +X) the rectangle.
Select Transparency Window and click Make Mask option to create the mask.

Select the Mask and paste the rectangle by selecting Paste in Front option from the Edit tool bar.


Adjust the gradient position to 29.59%

Paste this Shade behind the Pie.

Select Rotate option; Press Shift+Alt and click on the center of circle and rotate dialogue box will open as below.
Select angle as 36 degree and press Copy to create a shade behind the another pie

Press Control/Cmd + D to create a multiple shades in a same angle difference.

Create a new circle 10*10 mm; Press Shift+Alt and click on the center of circle and rotate dialogue box will open as below.
Select angle as 18 degree and press Copy to create a circle.


Press Control/Cmd + D to create a multiple circles with same angle difference.

Select the alternative circle as below and delete.


Change the color as per the pie color [Press I for Eyedropper tool to select the color]

Remove the extra shades out of circle by using Eraser Tool[Shift +E]

Type number and content.
Press Cmd/Ctrl+Shift +O to create the outline of the text and ungroup that by press Cmd/Ctrl+Shift+G.

Create rectangle H: 2 mm W: 10 mm.
Press Alt+Shift to create the copy of rectangle and move that in same axis.
Press cmd/ctrl + D to create the copy of rectangle in same direction and Group that rectangles by pressing Cmd/Ctrl + G


Place the Icons and content as per requirement.
Congratulations! You're Done!
Here's how it should look. I hope you've enjoyed this tutorial and can apply these techniques in your future projects.
Here's how it should look. I hope you've enjoyed this tutorial and can apply these techniques in your future projects.


No comments:
Post a Comment